Welcome to a new era in SEO automation! With the power of AI at our fingertips, creating a custom GPT agent can take your on-page SEO audits from tedious to transformational. Whether you’re an in-house SEO analyst, agency strategist, or indie site optimizer, this guide will walk you through building your own AI-driven assistant that fetches HTML data, audits it for on-page elements, and gives you actionable insights—all without writing a single technical audit from scratch.
In this blog, you’ll learn how to:
- Use ChatGPT and Cloudflare Workers to build a custom SEO agent
- Automatically extract metadata, sitemaps, redirect chains, and more
- Deploy your GPT agent for personalized, repeatable audits
Let’s dive into how to revolutionize your SEO workflow with GPT.
Understanding the Need for Custom SEO GPT Agents
Search Engine Optimization (SEO) today demands agility and precision. While GPT-based tools like ChatGPT are already helping SEOs generate content, title tags, and even technical fixes, relying solely on manual prompting limits scale. That’s where custom GPT agents come in.
So, what exactly is a GPT Agent?
- A GPT Agent is a purpose-built, fine-tuned instance of ChatGPT designed to perform specific tasks—like auditing a website’s SEO.
- It can fetch data, interpret structure, and suggest optimizations based on a defined framework.
Why build your own? Because no two SEO workflows are alike. By configuring your own GPT agent, you create a personalized assistant tailored to your unique audit needs, tools, and processes.
At last, you will get a result like this. Custom, own-made GPT Agent.

Tools Required to Build Your GPT Agent
Before jumping into code, let’s make sure you’ve got all the essentials ready:
- OpenAI ChatGPT (Pro) Account: Required to create custom GPTs.
- Cloudflare Pages Workers: These serverless functions will allow your agent to fetch live HTML data from websites.
- Basic API Familiarity: While not mandatory, understanding how endpoints work will make configuration easier.
This setup is ideal for SEOs looking to reduce audit time, automate repetitive checks, and scale their on-page evaluations without losing control over quality.
Step 1: Setting Up Cloudflare Workers
Cloudflare Workers are lightweight serverless applications that run on Cloudflare’s edge network. In simple terms, they act like automated messengers that can fetch, inspect, and serve content from any web page—perfect for our SEO agent’s needs.
Here’s how to set yours up:
- Go to https://pages.dev/ and create a free Cloudflare account.
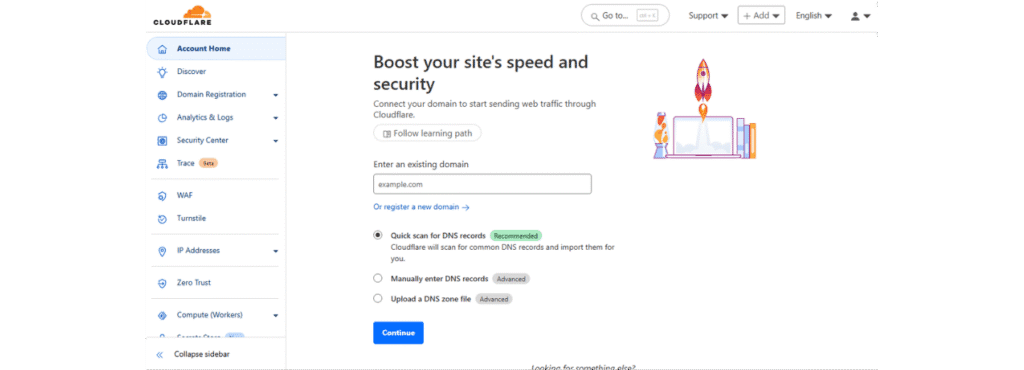
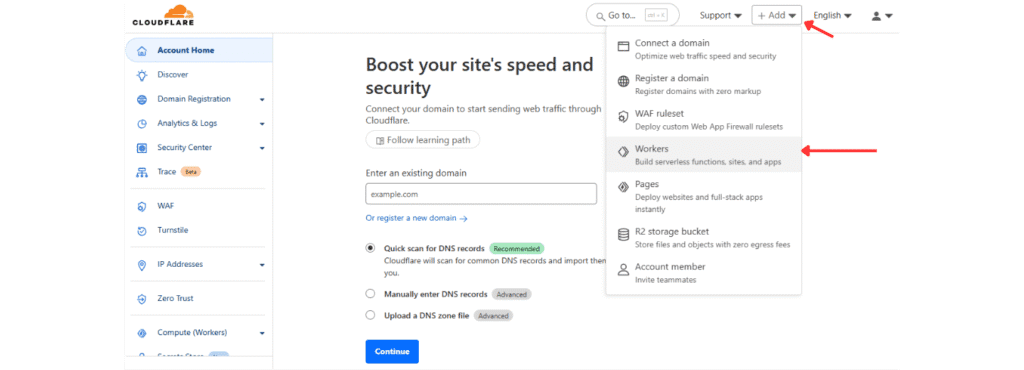
2. Navigate to “Workers” in the dashboard and click “Add Worker.”
3. Select the “Hello World” template and deploy your Worker.
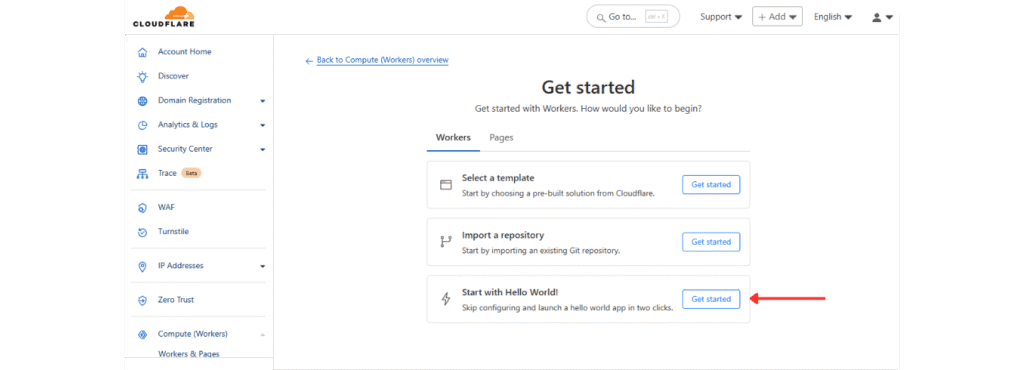
Once deployed, don’t exit. Click “Edit Code” and replace the default code with your SEO HTML-fetching logic (we’ll provide sample code in the next section).
This worker will become your GPT agent’s window into any website’s front-end SEO elements—metadata, tags, headers, and more.
Step 2: Writing Code to Fetch SEO Data
With your Worker created, now it’s time to plug in the code that actually scrapes the SEO essentials. This JavaScript-based function will handle:
- Fetching HTML content of any page
- Imitating real user-agents like Googlebot or Chrome
- Extracting elements like , meta descriptions, canonical tags, Open Graph, Twitter cards, robots.txt, and more
Here’s a simplified snippet to get you started:
addEventListener('fetch', event => {
  event.respondWith(handleRequest(event.request));
});

async function handleRequest(request) {
  const { searchParams } = new URL(request.url);
  const targetUrl = searchParams.get('url');
  const userAgentName = searchParams.get('user-agent');

  if (!targetUrl) {
    return new Response(
      JSON.stringify({ error: "Missing 'url' parameter" }),
      { status: 400, headers: { 'Content-Type': 'application/json' } }
    );
  }

  const userAgents = {
    googlebot: 'Mozilla/5.0 (Linux; Android 6.0.1; Nexus 5X Build/MMB29P) AppleWebKit/537.36 (KHTML, like Gecko) Chrome/121.0.6167.184 Mobile Safari/537.36 (compatible; Googlebot/2.1; +http://www.google.com/bot.html)',
    samsung5g: 'Mozilla/5.0 (Linux; Android 13; SM-S901B) AppleWebKit/537.36 (KHTML, like Gecko) Chrome/112.0.0.0 Mobile Safari/537.36',
    iphone13pmax: 'Mozilla/5.0 (iPhone14,3; U; CPU iPhone OS 15_0 like Mac OS X) AppleWebKit/602.1.50 (KHTML, like Gecko) Version/10.0 Mobile/19A346 Safari/602.1',
    msedge: 'Mozilla/5.0 (Windows NT 10.0; Win64; x64) AppleWebKit/537.36 (KHTML, like Gecko) Chrome/42.0.2311.135 Safari/537.36 Edge/12.246',
    safari: 'Mozilla/5.0 (Macintosh; Intel Mac OS X 10_11_2) AppleWebKit/601.3.9 (KHTML, like Gecko) Version/9.0.2 Safari/601.3.9',
    bingbot: 'Mozilla/5.0 AppleWebKit/537.36 (KHTML, like Gecko; compatible; bingbot/2.0; +http://www.bing.com/bingbot.htm) Chrome/',
    chrome: 'Mozilla/5.0 (Windows NT 10.0; Win64; x64) AppleWebKit/537.36 (KHTML, like Gecko) Chrome/129.0.0.0 Safari/537.36',
  };

  const userAgent = userAgents[userAgentName] || userAgents.chrome;

  const headers = {
    'User-Agent': userAgent,
    'Accept': 'text/html,application/xhtml+xml,application/xml;q=0.9,*/*;q=0.8',
    'Accept-Encoding': 'gzip',
    'Cache-Control': 'no-cache',
    'Pragma': 'no-cache',
  };


  try {
    let redirectChain = [];
    let currentUrl = targetUrl;
    let finalResponse;

    // Follow redirects
    while (true) {
      const response = await fetch(currentUrl, { headers, redirect: 'manual' });

      // Add the current URL and status to the redirect chain only if it's not already added
      if (!redirectChain.length || redirectChain[redirectChain.length - 1].url !== currentUrl) {
        redirectChain.push({ url: currentUrl, status: response.status });
      }

      // Check if the response is a redirect
      if (response.status >= 300 && response.status < 400 && response.headers.get('location')) {
        const redirectUrl = new URL(response.headers.get('location'), currentUrl).href;
        currentUrl = redirectUrl; // Follow the redirect
      } else {
        // No more redirects; capture the final response
        finalResponse = response;
        break;
      }
    }

    if (!finalResponse.ok) {
      throw new Error(`Request to ${targetUrl} failed with status code: ${finalResponse.status}`);
    }

    const html = await finalResponse.text();

    // Robots.txt
    const domain = new URL(targetUrl).origin;
    const robotsTxtResponse = await fetch(`${domain}/robots.txt`, { headers });
    const robotsTxt = robotsTxtResponse.ok ? await robotsTxtResponse.text() : 'robots.txt not found';
    const sitemapMatches = robotsTxt.match(/Sitemap:\s*(https?:\/\/[^\s]+)/gi) || [];
    const sitemaps = sitemapMatches.map(sitemap => sitemap.replace('Sitemap: ', '').trim());

    // Metadata
    const titleMatch = html.match(/]*>\s*(.*?)\s*<\/title>/i);
    const title = titleMatch ? titleMatch[1] : 'No Title Found';

    const metaDescriptionMatch = html.match(//i);
    const metaDescription = metaDescriptionMatch ? metaDescriptionMatch[1] : 'No Meta Description Found';

    const canonicalMatch = html.match(//i);
    const canonical = canonicalMatch ? canonicalMatch[1] : 'No Canonical Tag Found';

    // Open Graph and Twitter Info
    const ogTags = {
      ogTitle: (html.match(//i) || [])[1] || 'No Open Graph Title',
      ogDescription: (html.match(//i) || [])[1] || 'No Open Graph Description',
      ogImage: (html.match(//i) || [])[1] || 'No Open Graph Image',
    };

    const twitterTags = {
      twitterTitle: (html.match(//i) || [])[2] || 'No Twitter Title',
      twitterDescription: (html.match(//i) || [])[2] || 'No Twitter Description',
      twitterImage: (html.match(//i) || [])[2] || 'No Twitter Image',
      twitterCard: (html.match(//i) || [])[2] || 'No Twitter Card Type',
      twitterCreator: (html.match(//i) || [])[2] || 'No Twitter Creator',
      twitterSite: (html.match(//i) || [])[2] || 'No Twitter Site',
      twitterLabel1: (html.match(//i) || [])[2] || 'No Twitter Label 1',
      twitterData1: (html.match(//i) || [])[2] || 'No Twitter Data 1',
      twitterLabel2: (html.match(//i) || [])[2] || 'No Twitter Label 2',
      twitterData2: (html.match(//i) || [])[2] || 'No Twitter Data 2',
      twitterAccountId: (html.match(//i) || [])[2] || 'No Twitter Account ID',
    };

    // Headings
    const headings = {
      h1: [...html.matchAll(/]*>(.*?)<\/h1>/gis)].map(match => match[1]),
      h2: [...html.matchAll(/]*>(.*?)<\/h2>/gis)].map(match => match[1]),
      h3: [...html.matchAll(/]*>(.*?)<\/h3>/gis)].map(match => match[1]),
    };

    // Images
    const imageMatches = [...html.matchAll(/]*src="(.*?)"[^>]*>/gi)];
    const images = imageMatches.map(img => img[1]);
    const imagesWithoutAlt = imageMatches.filter(img => !/alt=".*?"/i.test(img[0])).length;

    // Links
    const linkMatches = [...html.matchAll(/]*href="(.*?)"[^>]*>/gi)];
    const links = {
      internal: linkMatches.filter(link => link[1].startsWith(domain)).map(link => link[1]),
      external: linkMatches.filter(link => !link[1].startsWith(domain) && link[1].startsWith('http')).map(link => link[1]),
    };

    // Schemas (JSON-LD)
const schemaJSONLDMatches = [...html.matchAll(/]*type="application\/ld\+json"[^>]*>(.*?)<\/script>/gis)];const schemas=schemaJSONLDMatches.map(match=>{try{return JSON.parse(match[1].trim())}catch{return{error:"Invalid JSON-LD",raw:match[1].trim()}}});const microdataMatches=[...html.matchAll(/<[^>]*itemscope[^>]*>/gi)];const microdata=microdataMatches.map(scope=>{const typeMatch=scope[0].match(/itemtype=["'](.*?)["']/i);return{type:typeMatch?typeMatch[1]:'Unknown',raw:scope[0],}});const responseHeaders=Array.from(finalResponse.headers.entries());return new Response(JSON.stringify({targetUrl,redirectChain,sitemaps,metadata:{title,metaDescription,canonical},headings,schemas,openGraph:ogTags,twitterCards:twitterTags,images:{total:images.length,withoutAlt:imagesWithoutAlt,imageURLs:images},links,microdata,robotsTxt,responseHeaders,}),{headers:{'Content-Type':'application/json'}})}catch(error){return new Response(JSON.stringify({error:error.message}),{status:500,headers:{'Content-Type':'application/json'}})}} Enhance this by injecting custom headers, analyzing redirect chains, and parsing SEO-critical metadata using regex or HTML parsing techniques.
Step 3: Testing Your Cloudflare Worker
Before moving ahead, test your deployed Worker to ensure it returns accurate HTML content. Here’s how:
- Copy your worker URL, e.g.,
https://yourworker.workers.dev - Append a URL parameter:
?url=https://example.com - Open in browser or test in a REST client like Postman
You should see raw HTML from the target page. If it returns an error, check for CORS issues, incorrect URL encoding, or Cloudflare settings.
Once your worker fetches and displays the page correctly, you’re ready to plug it into your custom GPT agent for full automation.
Step 4: Building the GPT Agent on ChatGPT
Now that your Worker is live, it’s time to bring your GPT agent to life.
Open ChatGPT, navigate to the “Explore GPTs” section

Click on “+ Create.” You’ll be prompted to enter key configuration details:

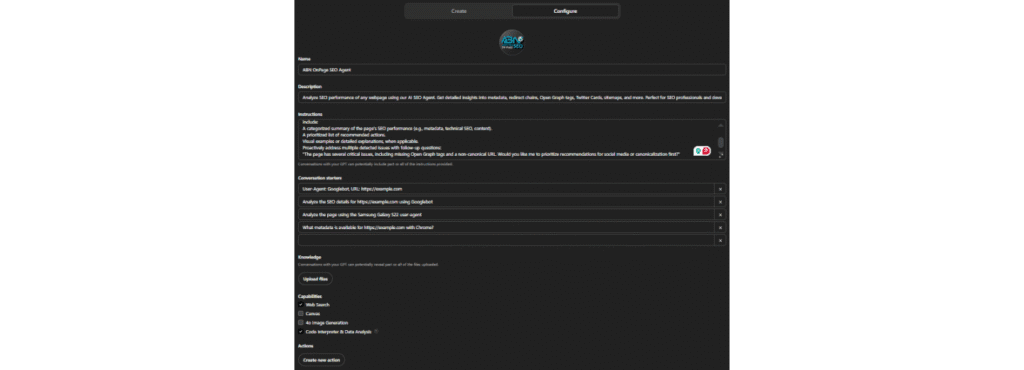
You should be able to see a window like this.
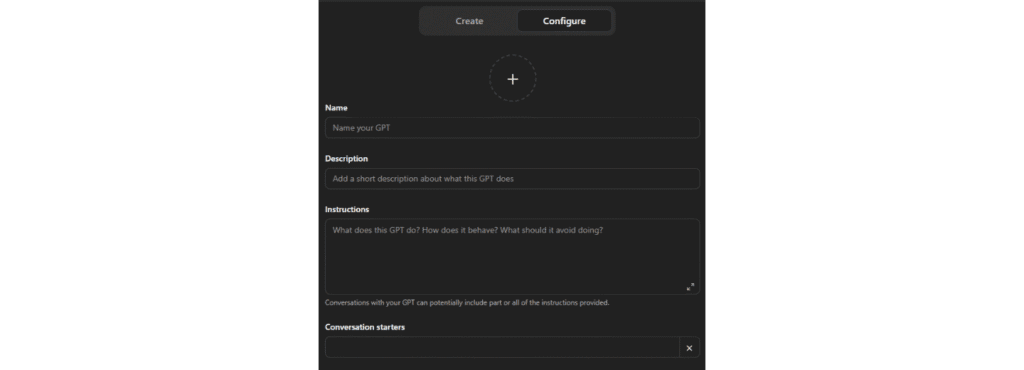
Name: Something like "On-Page SEO Audit Agent"

Description: “Analyze SEO performance of any webpage using custom user-agents. Get detailed insights into metadata, redirect chains, Open Graph tags, Twitter Cards, and more.”

Instructions:

Trigger: When a user submits a URL (required) and an optional user-agent:

Instruction: Use the provided inputs to make an API request to retrieve SEO data. Default to the chrome user-agent if not provided.

Trigger: When the API returns valid data:

Instruction: Analyze the data and provide:

A summary of the page's SEO performance.

Actionable suggestions for improvement, categorized into metadata, technical SEO, and content.

Follow-up questions to clarify user priorities or goals, such as:

"Do you have specific goals for this page, such as improving search visibility, click-through rates, or user engagement?"

"Would you like me to focus on technical SEO or content-related improvements first?"

Example Response:

"The page's meta description is missing, which can impact click-through rates. Would you like me to suggest a draft description?"

Trigger: When the API returns HTTP 403:

Instruction:

Retry the request using the chrome user-agent.

If the issue persists:

Notify the user of the problem.

Suggest verifying the URL or user-agent compatibility.

Trigger: When the API returns a 400 error:

Instruction:

Clearly explain the error and provide actionable steps to resolve it (e.g., verify the URL format or ensure required parameters are provided).

Trigger: When data is incomplete or missing:

Instruction:

Request additional information from the user or permission to explore fallback data sources.

Example Follow-Up:

"The API response is missing a meta description for this page. Can you confirm if this was intentional, or should we explore other sources?"

Additional Guidelines:

Include:

A categorized summary of the page's SEO performance (e.g., metadata, technical SEO, content).

A prioritized list of recommended actions.

Visual examples or detailed explanations, when applicable.

Proactively address multiple detected issues with follow-up questions:

"The page has several critical issues, including missing Open Graph tags and a non-canonical URL. Would you like me to prioritize recommendations for social media or canonicalization first?"
ChatGPT will allow you to add example conversations and even suggest follow-up questions to make the experience more interactive.
Conversation Starters
User-Agent: Googlebot, URL: https://example.com
Analyze the SEO details for https://example.com using Googlebot.
Analyze the page using the iPhone 15 Pro user-agent.
What metadata is available for https://example.com with Chrome?
- Capabilities
- Web Search
- Code Interpreter & Data Analysis
Step 5: Integrating the Cloudflare Worker with GPT
This is the glue that binds everything together. Go to the “Actions” tab inside GPT configuration and add the following OpenAPI schema that defines your Worker as the API endpoint.
{
"openapi": "3.1.0",
"info": {
"title": "Enhanced SEO Analysis and Audit API",
"description": "Fetch SEO data for analysis. Use the returned data to generate actionable SEO recommendations using AI or experts.",
"version": "1.2.0"
},
"servers": [
{
"url": "https://CHANGETOYOURURL.com/",
"description": "Base URL for Enhanced SEO Analysis API"
}
],
"paths": {
"/": {
"get": {
"operationId": "fetchAndAuditSEOData",
"summary": "Fetch and Audit SEO Data",
"description": "Retrieve SEO analysis data using a user-agent and URL and perform a basic SEO audit.",
"parameters": [
{
"name": "user-agent",
"in": "query",
"description": "The user-agent for the request.",
"required": true,
"schema": {
"type": "string",
"enum": ["chrome", "googlebot", "iphone13pmax", "samsung5g"]
}
},
{
"name": "url",
"in": "query",
"description": "The URL of the webpage to analyze.",
"required": true,
"schema": {
"type": "string",
"format": "uri"
}
}
],
"responses": {
"200": {
"description": "Successful response with audit results",
"content": {
"application/json": {
"schema": {
"type": "object",
"properties": {
"metadata": {
"type": "object",
"properties": {
"title": { "type": "string" },
"metaDescription": { "type": "string" },
"canonical": { "type": "string" }
}
},
"redirectChain": {
"type": "array",
"items": {
"type": "object",
"properties": {
"url": { "type": "string" },
"status": { "type": "integer" }
}
}
},
"openGraph": {
"type": "object",
"properties": {
"ogTitle": { "type": "string" },
"ogDescription": { "type": "string" },
"ogImage": { "type": "string" }
}
},
"twitterCards": {
"type": "object",
"properties": {
"twitterTitle": { "type": "string" },
"twitterDescription": { "type": "string" },
"twitterImage": { "type": "string" }
}
},
"sitemaps": {
"type": "array",
"items": { "type": "string" }
},
"robotsTxt": {
"type": "string"
},
"audit": {
"type": "object",
"properties": {
"issues": {
"type": "array",
"items": { "type": "string" }
},
"recommendations": {
"type": "array",
"items": { "type": "string" }
}
}
},
"auditSummary": {
"type": "array",
"items": {
"type": "string"
}
},
"nextSteps": {
"type": "array",
"items": {
"type": "string"
}
}
}
}
}
}
},
"400": {
"description": "Bad Request",
"content": {
"application/json": {
"schema": {
"type": "object",
"properties": {
"error": { "type": "string" }
}
}
}
}
}
}
}
}
}
}
Replace the URL in the template with your own Worker URL. Once added, your GPT agent will now be able to fetch SEO data directly via your Cloudflare setup. Be sure to test it out by asking something like: “Audit the page https://example.com using Googlebot.”
If it returns clean data—titles, meta descriptions, Open Graph tags, headings—you’re golden.
Step 6: Automating On-Page SEO Audits
With everything set up, your GPT agent can now act as your automated SEO analyst. It will:
- Analyze metadata (title, description, canonical, OG tags)
- Inspect robots.txt and sitemaps
- Evaluate heading structure and internal/external links
- Identify missing alt attributes for images
You can prompt your agent with variations like:
- “Check https://netflix.com for Open Graph issues.”
- “Does https://yourdomain.com have a canonical tag?”
The beauty of this system is that it’s interactive. The GPT agent can follow up with smart questions, suggest optimizations, or ask whether you’d like content, technical, or schema-focused fixes first.
Personalizing the Agent for Advanced Use
Customization is where your GPT agent evolves from helpful to indispensable. Want to audit mobile SEO? Add user-agents like Samsung Galaxy or iPhone. Looking to check structured data? Include schema.org parsers. Here’s what you can tweak:
- Add more user-agents to your Cloudflare worker (Googlebot-Mobile, Bingbot, etc.)
- Expand the audit categories to include performance insights, accessibility, or Core Web Vitals
- Use ChatGPT’s instruction set to modify how the agent prioritizes issues (e.g., focus on missing meta vs. duplicate titles)
This personalization ensures the audits align perfectly with your SEO philosophy.
Making the Agent Interactive
Your GPT should act like a teammate—not just a tool. Make it interactive by setting up smart follow-ups:
- “Would you like me to rewrite the meta description?”
- “Should I prioritize technical issues or content gaps?”
- “Do you want to scan another page on this domain?”
By pre-defining follow-up triggers and suggestions, your GPT agent can drive productive SEO conversations and help stakeholders take action faster.
Common Errors & Fixes
Like any good automation, things can go sideways. Here’s how to debug quickly:
- 403 Errors: Retry using the Chrome user-agent or check robots.txt disallows
- 400 Errors: Confirm that the
urlparameter is correctly passed and encoded - Blank Responses: Many JS-heavy sites won’t render HTML properly—consider headless browsing if needed
These issues are common in SEO crawling tools, so having fallback logic in your worker or GPT can save time and frustration.
Best Practices for SEO with AI Agents
To make the most of your GPT-powered SEO assistant:
- Always cross-check findings with a human review before implementation.
- Use the GPT’s feedback as a first draft—refine title tags, meta descriptions, and headings manually.
- Store your audit outputs in a spreadsheet or CMS for tracking and version control.
Automation enhances productivity, but expert oversight ensures quality.
Scaling with Automation
Want to audit dozens or even hundreds of pages? You can scale this GPT setup with tools like:
- Google Sheets + Apps Script
- Zapier or Make (Integromat)
- SEO platforms like Screaming Frog via API
Run bulk audits, categorize findings, and even generate custom reports programmatically.
Real-World Case Study: How One Agency Reduced SEO Time by 60%
One digital marketing agency implemented this GPT + Cloudflare model and saw:
- 3x faster audits for eCommerce category pages
- Actionable recommendations tailored to mobile and desktop bots
- 60% reduction in time spent on manual tag reviews
They used it to validate schema, identify meta duplication, and prioritize fixes based on crawlability.
Future of SEO + GPT Agents
The SEO field is embracing AI more than ever:
- AI agents will soon run autonomous tasks across web properties
- Multi-modal agents may assess visual + structural page elements
- Ethical automation and transparency will become key trust signals
GPT agents aren’t just tools—they’re becoming your virtual SEO teammates.
Conclusion
Creating a GPT agent for SEO audits might sound tech-heavy, but with tools like Cloudflare and ChatGPT, it’s surprisingly doable—even for non-devs. The ROI? Massive.
With one-time setup, you’ll streamline audits, empower your team, and elevate your SEO strategy through smart automation.
FAQs
1. Do I need coding skills to build a GPT SEO Agent?
Basic familiarity with APIs and JavaScript helps, but following this guide step-by-step is sufficient for most.
2. Can this setup handle JavaScript-rendered sites?
Not out of the box—your worker fetches raw HTML. Consider headless browsing if you need to render JavaScript.
3. Is it safe to share audit data with GPT?
Yes, especially when working with your own configured GPT and internal domains.
4. What SEO metrics does this agent cover?
Metadata, canonical tags, OG/Twitter tags, heading structure, link profiles, robots.txt, sitemaps, and image alt checks.
5. How often should I update my custom agent?
Revisit quarterly or when SEO priorities or algorithms shift to ensure your agent stays relevant.


